Gel nails look amazing, glossy, long-lasting, and perfect for everything from everyday wear to detailed designs.
Gel nails look amazing, glossy, long-lasting, and perfect for everything from everyday wear to detailed designs.
But if you’ve ever tried doing them at home, you might have run into some frustrating issues:
- Nails feeling thin or damaged after removal
- Gel polish that chips too soon
- Difficulty figuring out how to take off gel nail polish safely
- Confusion about the right prep and products
The truth is, most of these problems aren’t caused by gel polish itself; they’re caused by how it’s applied and removed.
Let’s fix that.
Common Mistakes People Make with Gel Nails
If your gel manicure isn’t lasting or is damaging your nails, chances are you’re dealing with one (or more) of these:
- Skipping proper steps when learning how to prep nails for gel polish
- Peeling off gel instead of removing it correctly
- Using harsh or low-quality formulas
- Not giving nails time to recover between applications
- Struggling to create clean nail art using gel polish due to improper technique
These small mistakes can lead to big problems over time, including brittle nails and uneven surfaces.
Why Gel Nails Sometimes Damage Your Nails?
Gel polish itself isn’t the enemy; poor technique is.
Here’s what’s really happening:
1. Improper Removal Weakens Nails
If you’re not following the right method for how to take off gel nail polish, you may end up peeling layers of your natural nail along with the polish.
2. Lack of Proper Prep
Skipping steps in how to prep nails for gel polish prevents proper adhesion, leading to lifting and chipping.
3. Harsh Ingredients
Some gel polishes contain chemicals that can dry out or irritate your nails, especially with repeated use.
That’s why many people are now switching to non-toxic gel nail polish for safer, long-term use.
Practical Steps for Healthy, Long-Lasting Gel Nails
Let’s simplify the process so you can get salon-quality results at home without damage.
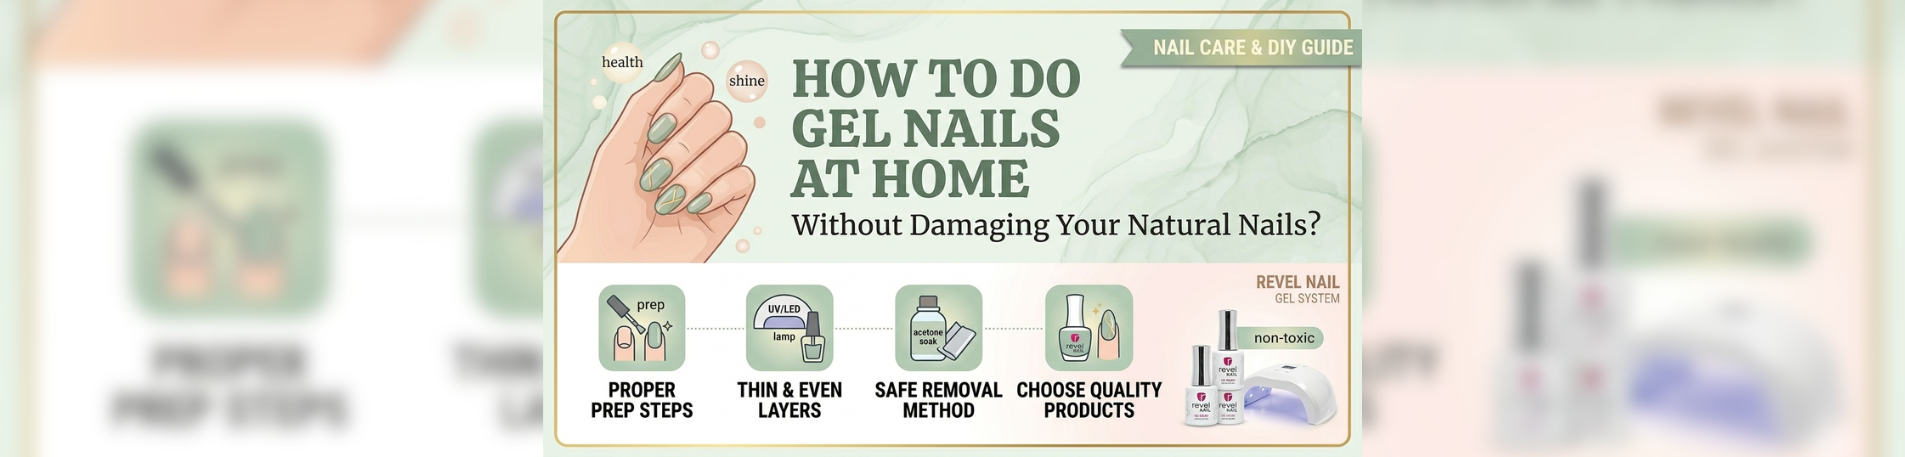
1. Prep Your Nails the Right Way
Proper prep is the foundation of a great manicure.
When learning how to prep nails for gel polish, focus on:
- Cleaning nails thoroughly
- Gently pushing back cuticles
- Buffing lightly to remove shine
- Applying a quality base coat
Skipping this step is one of the biggest reasons gel polish fails.
2. Apply Thin, Even Layers
Thick layers don’t cure properly and can lead to peeling.
Instead:
- Apply thin coats
- Cure each layer fully under a UV/LED lamp
- Build coverage gradually
3. Be Gentle During Removal
One of the most important skills is knowing how to take off gel nail polish without causing damage.
Here’s a simple method:
- File the top coat lightly
- Soak cotton in acetone and place it on the nails
- Wrap with foil and wait 10–15 minutes
- Gently push off softened gel (don’t force it)
Patience here makes all the difference.
4. Choose Safer, High-Quality Products
Switching to non-toxic gel nail polish can reduce exposure to harsh chemicals and keep your nails healthier over time.
Look for formulas that are:
- Free from harmful additives
- Designed for long wear without damage
- Suitable for frequent use
5. Experiment with Simple Nail Art
Once your base routine is solid, you can explore nail art using gel polish.
Start simple:
- Minimalist lines
- French tips
- Accent nails
As your confidence grows, so will your creativity.
A Smarter Way to Upgrade Your Gel Nail Routine
If you’ve been piecing together random tools and products, it can feel overwhelming and inconsistent.
That’s where more complete systems come in.
Brands like Revel Nail offer a more streamlined approach, combining quality formulas with user-friendly application. Instead of guessing what works together, their products are designed to support both beginners and experienced users.
For example, many people transitioning to at-home gel routines find that systems like Revel Nail make it easier to:
- Follow proper prep and application steps
- Use non-toxic gel nail polish options confidently
- Achieve smoother, longer-lasting results
It’s less about “buying more” and more about choosing better.
Why Upgrading Your Nail Routine Matters?
Once you refine your process and use better products, the results speak for themselves.
1. Stronger, Healthier Nails
No more peeling or thinning after removal.
2. Longer-Lasting Manicures
Proper prep and quality products reduce chipping and lifting.
3. Easier Removal Process
When applied correctly, gel polish comes off more cleanly and safely.
4. More Creative Freedom
With a solid foundation, nail art using gel polish becomes easier and more enjoyable.
5. Less Trial and Error
Using a trusted system like Revel Nail helps eliminate guesswork, saving time and frustration.
Final Thoughts: It’s Not About Perfection, It’s About Process
Gel nails don’t have to damage your natural nails.
In fact, when done correctly, they can actually protect them.
Focus on:
- Learning how to prep nails for gel polish properly
- Using the correct method for how to take off gel nail polish
- Choosing safer, non-toxic gel nail polish options
- Building your skills gradually with nail art using gel polish
And when you’re ready to simplify your routine, exploring well-designed solutions like Revel Nail can help you get better results with less effort.
Because great nails aren’t just about how they look, they’re about how you care for them.